Integrate the Scandit SDK into your app

Integrate the Scandit Barcode Scanner into your own app by following these 6 steps:

Download the Scandit Barcode Scanner library

Choose a plan (e.g.,“Consumer Apps”, "Professional Apps", or “Enterprise/OEM” plan) at http://www.scandit.com/pricing, activate your account and log in. Go to the Download section and download the Barcode Scanner for iOS.

Framework Download

Add other required frameworks to your Xcode project

The Scandit Barcode Scanner needs multiple frameworks that might not be part of your Xcode project yet. Add all the frameworks and libraries that are listed:

  • libc++.tbd
  • libiconv.tbd
  • libz.tbd
  • CoreText.framework
  • OpenGLES.framework
  • MessageUI.framework
  • CoreVideo.framework
  • UIKit.framework
  • Foundation.framework
  • CoreGraphics.framework
  • AudioToolbox.framework
  • AVFoundation.framework
  • CoreMedia.framework
  • QuartzCore.framework
  • SystemConfiguration.framework
  • MediaPlayer.framework

Add the scanner framework to your project

Unpack the downloaded ZIP file and open the folder named ScanditSDK, it contains the ScanditBarcodeScanner framework. Drag and drop the framework into your Xcode project. Make sure to select "Copy items if needed" to copy the framework into your project's folder.

Frameworks to be added


The framework contains resources that you have to link to in the project. For this right click on the ScanditBarcodeScanner framework inside your project and select "Show in Finder". Go to ScanditBarcodeScanner.framework/Resources and drag and drop ScanditBarcodeScanner.bundle into your Xcode project. In the end it should look the following way:

Frameworks to be added

Integration in a Swift project

If you are using Swift to develop your app, you can import the framework as follows:

import ScanditBarcodeScanner

Integration in an Objective-C project

If you are using Objective-C to develop your app, you can import the framework's headers as follows:

#import <ScanditBarcodeScanner/ScanditBarcodeScanner.h>

Set the license key

Sign in to your account at http://account.scandit.com to look up your license key in the License Keys section.
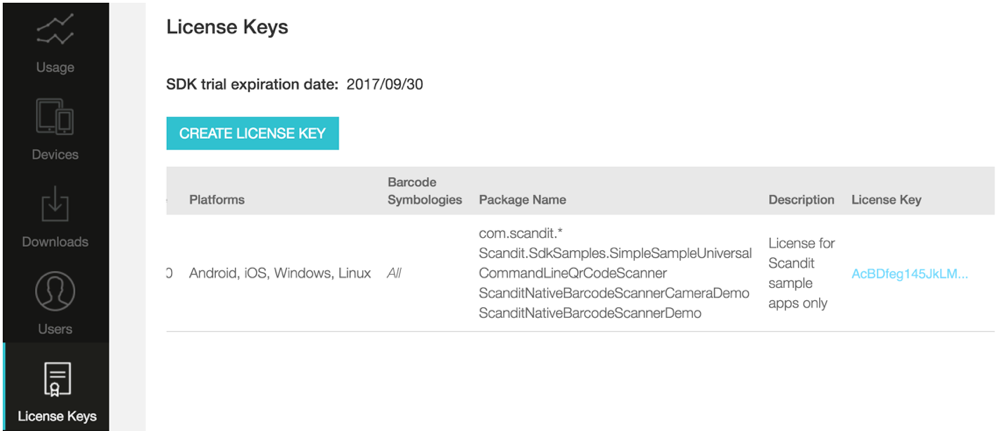
License Key in your account

Set the license key in your AppDelegate's applicationDidFinishLaunching method the following way:

Objective-C:

#import <ScanditBarcodeScanner/ScanditBarcodeScanner.h>
@implementation AppDelegate
- (void)applicationDidFinishLaunching:(UIApplication *)application {
// Provide the license key for your scandit license.
[SBSLicense setAppKey:@"-- ENTER YOUR SCANDIT LICENSE KEY HERE --"];
...
}

Swift:

// Provide the license key for your scandit license.
private let APP_KEY = "-- ENTER YOUR SCANDIT LICENSE KEY HERE --"
func application(_ application: UIApplication, didFinishLaunchingWithOptions launchOptions: [UIApplicationLaunchOptionsKey: Any]?) -> Bool {
SBSLicense.setAppKey(APP_KEY)
...
return true
}

Add code to handle the scanning event

Implement the SBSScanDelegate protocol to handle the successful barcode decoding. The API reference of the SBSScanDelegate protocol provides more details about what is returned.

Careful: The SBSScanDelegate method2 is invoked on a picker-internal queue. To perform any UI work, you must dispatch to the main UI thread.

Objective-C:

#import <ScanditBarcodeScanner/ScanditBarcodeScanner.h>
...
- (void)barcodePicker:(SBSBarcodePicker *)picker didScan:(SBSScanSession *)session {
NSArray *recognized = session.newlyRecognizedCodes;
SBSCode *code = [recognized firstObject];
// Add your own code to handle the barcode result e.g.
NSLog(@"scanned %@ barcode: %@", code.symbologyName, code.data);
}

Swift:

func barcodePicker(_ picker: SBSBarcodePicker, didScan session: SBSScanSession) {
guard let code = session.newlyRecognizedCodes.first else { return }
print("scanned \(code.symbologyName) barcode: \(code.data)")
}

If you are displaying the SBSBarcodePicker modally and want to use the scanner's toolbar to cancel and return you will also need to implement the SBSOverlayControllerDidCancelDelegate.

Objective-C:

#import <ScanditBarcodeScanner/ScanditBarcodeScanner.h>
...
- (void)overlayController:(SBSOverlayController *)overlayController
didCancelWithStatus:(NSDictionary *)status {
// Add your own code to handle the user canceling the barcode scan process
}

Swift:

func overlayController(_ overlayController: SBSOverlayController, didCancelWithStatus status: [AnyHashable : Any]?) {
// Add your own code to handle the user canceling the barcode scan process
}

Add code to start the scanning process

The scanning process is started by instantiating SBSBarcodePicker, specifying the delegate that will receive the scan callback event and then starting the scanner.

Objective-C:

#import <ScanditBarcodeScanner/ScanditBarcodeScanner.h>
...
// Configure the barcode picker through a scan settings instance by defining which
// symbologies should be enabled.
// prefer backward facing camera over front-facing cameras.
// Enable symbologies that you want to scan
[scanSettings setSymbology:SBSSymbologyEAN13 enabled:YES];
[scanSettings setSymbology:SBSSymbologyUPC12 enabled:YES];
[scanSettings setSymbology:SBSSymbologyQR enabled:YES];
SBSBarcodePicker *picker = [[SBSBarcodePicker alloc] initWithSettings:scanSettings];
// Set the delegate to receive scan events.
picker.scanDelegate = self;
// Start the scanning process.
[picker startScanning];
// Show the scanner. The easiest way to do so is by presenting it modally.
[self presentViewController:picker animated:YES completion:nil];

Swift:

// Configure the barcode picker through a scan settings instance by defining which
// symbologies should be enabled.
let scanSettings = SBSScanSettings.default()
// prefer backward facing camera over front-facing cameras.
scanSettings.cameraFacingPreference = .back
// Enable symbologies that you want to scan
scanSettings.setSymbology(.ean13, enabled: true)
scanSettings.setSymbology(.upc12, enabled: true)
scanSettings.setSymbology(.qr, enabled: true)
let picker = SBSBarcodePicker(settings: scanSettings)
// Set the delegate to receive scan events.
picker.scanDelegate = self
// Start the scanning process.
picker.startScanning()
// Show the scanner. The easiest way to do so is by presenting it modally.
present(picker, animated: true, completion: nil)

Next steps