Advanced Topics
Advanced Camera Functionality
In this guide, you will learn about advanced camera functionality not explained in the “Getting Started” guides.
Before you start…
To get the most out of this guide, we recommend that you first take a look at the following guides:
One of the “Getting Started” guides for barcode capture or barcode tracking
The data capture context supports using different frame sources to perform recognition on. Most applications will use the built-in camera of the device, e.g. the world-facing camera of a device. The remainder of this guide will assume that you use the built-in camera.
Switching between World-Facing and User-Facing
In your app you might want to switch between using the world-facing and user-facing camera for different use cases. As these are different cameras entirely switching between them is done by instantiating an entirely new camera and setting it as the data capture context’s new frame source.
Let’s start with the world facing camera. What we do is very similar to the camera section in the “Getting Started” guides, but here we want to specifically use the world-facing camera. Remember to use the recommended camera settings for whichever data capture mode you are using.
var cameraSettings = ...;
var worldFacingCamera = Camera.atPosition(CameraPosition.worldFacing);

worldFacingCamera.applySettings(cameraSettings);

// Set the camera as the frame source and turn it on.
context.setFrameSource(worldFacingCamera);
worldFacingCamera.switchToDesiredState(FrameSourceState.on);
At this point we have a running world-facing camera that is used by the context. Whenever we want to switch to a user-facing camera, we simply turn off the world-facing camera and create a new user-facing camera that we set as the new frame source.
worldFacingCamera.switchToDesiredState(FrameSourceState.off);

Camera userFacingCamera = Camera.getCamera(CameraPosition.userFacing);

userFacingCamera.applySettings(cameraSettings);

// Set the new camera as the frame source and turn it on.
dataCaptureContext.setFrameSource(userFacingCamera);
userFacingCamera.switchToDesiredState(FrameSourceState.on);
Using the Standby State
The camera has three different states: off, on and standby.
Depending on the device, the transition between standby and on can be up to 90% faster (up to 50% faster on Android devices) than the transition between off and on. We strongly recommend using standby when the user is likely to be scanning in quick succession. This will minimize delays when starting the camera. Battery usage when the camera is in standby is slightly higher than when it is in off (especially on iOS devices). However, this is more than offset by the fact that total scanning time is reduced. This means that in the vast majority of cases there is no overall impact on battery life.
Because of this, it is important to be selective about the usage of the standby state and avoid keeping the camera in standby throughout the entire app. To minimize the additional battery usage it is better to go into standby only on certain screens where repeated scanning is expected. In rare cases where the entire app does repeated scanning, keeping the camera in standby throughout the entire app might be worth the additional battery usage.
Note
When using Camera API 1 (the default) it is currently not possible to switch the resolution of the preview while the camera is running. This restriction also counts for the standby state but will be addressed for 6.7.0.
App Flow with Standby State
When using the standby state the typical app flow will be along the following lines:
Move to a screen in the app that has scanning capabilities
Change the camera’s state to standby
Repeatedly change to on and back to standby as the user starts and stops scanning
Move away from the screen and change the camera state back to off
For apps that are fully centered around scanning it might be a better option to stay in standby throughout at the cost of the slight battery usage increase:
Setting the Standby State
Setting the standby state is very straight forward and works just like any other settable FrameSourceState:
camera.switchToDesiredState(FrameSourceState.standby);

// Time passes until the scanner should become active
camera.switchToDesiredState(FrameSourceState.on);

// After scanning the camera can go to standby again
camera.switchToDesiredState(FrameSourceState.standby);
Set up the Active Scan Area and Location Selection
By default capture modes will try to read barcodes, text etc anywhere in the camera frames. However, in some cases you want to restrict the area in which the capture modes search. For example, you may want to scan codes only at one location to let users pick a barcode by precisely pointing at it. Or part of the camera preview is covered by UI elements and you want to ensure that no codes are scanned below these elements.
This page describes how to setup the scan area for data capture modes to get the optimal behavior for your app.
Setting up the Scan Area for Your Use Case
The Scan Area is Restricted to the Visible Part of the Preview
When displaying the processed frames in the DataCaptureView, the scan area is automatically restricted to what is visible. This avoids unexpected scans as the code first has to be visible on screen before it can be scanned. This is especially important when the preview only shows a small part of the whole camera frame, e.g. when using a cropped view.
If you want to scan codes in the whole visible area, no further configuration is required. If there are some UI elements overlaying the camera preview you might want to further restrict the scan area to really only be the final visible part of the preview and avoid picking up codes that the user can’t see yet. For this you can change the DataCaptureView.scanAreaMargins property on the DataCaptureView.
Note
If there is nothing laying on top of the camera preview but you still want to reduce the scan area please have a look at location selections for this instead of scan area margins. Location selections are centered on the point of interest and are sized like viewfinders which makes them a much better fit for such use cases.
Here is an example of restricting the scanning area by 200 device independent pixels from the bottom because a view is covering the bottom of the screen.
var view = DataCaptureView.forContext(context,
    scanAreaMargins: MarginsWithUnit(DoubleWithUnit(0, MeasureUnit.dip), DoubleWithUnit(0, MeasureUnit.dip),
        DoubleWithUnit(0, MeasureUnit.dip), DoubleWithUnit(200, MeasureUnit.dip)));
If you want to adjust margins based on the view dimensions or orientation, e.g. to use different margins based on the device orientation, you can observe view size and orientation changes on the data capture view by registering a DataCaptureViewListener on the data capture view.
Changing the Point of Interest
By default, scanning is optimized for the center of the visible part of the preview (or the center of the frame if the frame is not displayed in a DataCaptureView). This is specified through what we call the point of interest. This point is also where code selection happens if it is enabled, more on that in the next section.
If you want to shift the scanning to another point, you can pass the desired point of interest to the DataCaptureView constructor. For example, the code below shifts the point of interest vertically to a fourth of the height:
var view = DataCaptureView.forContext(context,
    pointOfInterest:
        PointWithUnit(DoubleWithUnit(0.5, MeasureUnit.fraction), DoubleWithUnit(0.25, MeasureUnit.fraction)));
When specifying fractions, they are relative to the visible area minus the margins. This means that a point of interest of 0.5/0.5 is always centered in the scan area defined through the size of the view and potentially added margins.
As indicated above, register a DataCaptureViewListener on the data capture view to change the point of interest whenever the view dimension or orientation changes.
Location Selection
Note
Location selection is not available for every DataCaptureMode. This section will concentrate on BarcodeCapture but it can be applied exactly the same to other modes that allow setting a LocationSelection in their settings.
Sometimes it is necessary to let the user select which code to scan, e.g. to select one code from a dense stack of barcodes. Enabling full-image scanning is not desired in that case as any of the codes currently visible on screen could be returned as part of the results. To not return a random code but clearly target specific codes, a LocationSelection can be set in the BarcodeCaptureSettings. Location selections implement a specific strategy to select barcodes by their location.
Radius Location Selection
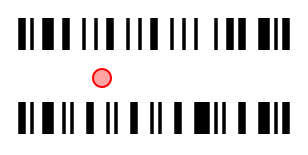
The RadiusLocationSelection is the simplest and for barcode scanning the preferred way of location selection. It lets you define a radius around the point of interest (see previous section). Any barcode touched by the circle will be recognized and returned, any barcode not touched by the circle will be entirely ignored. Radius location selection can resolve all of the following scenarios that could not be handled properly with full-image scanning:
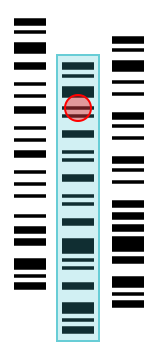
Selecting stacked codes, e.g. a sheet of vertically-stacked Code 128. Here the middle code will be returned as it is touched by the circle while the code above and below are not.
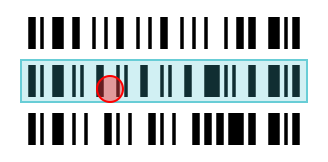
Selecting codes printed next to each other. Once again only the middle code is returned as it is the only one touched by the circle.

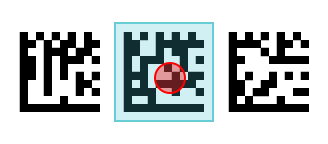
Both of those scenarios work with any symbology, here an example of Data Matrix codes printed next to each other.
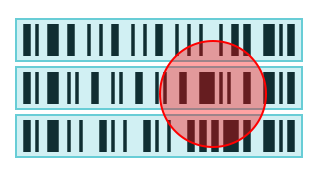
As the code selection is done through a circle it works just as well for vertical codes, or codes at any other angle.
A RadiusLocationSelection is created by specifying a radius and then setting it on the barcode capture settings with BarcodeCaptureSettings.locationSelection. For example, the code below creates a radius location selection for a radius of 0 (a valid radius forcing barcodes to contain the point of interest):
var barcodeCaptureSettings = ...;
barcodeCaptureSettings.locationSelection = RadiusLocationSelection(DoubleWithUnit(0, MeasureUnit.fraction));
When choosing the radius it is important to consider two potential issues:
If the radius chosen is too large, it might often be touching multiple barcodes at the same time. In this case it is not a given that the central barcode will be returned and it is advicable to reduce the radius.
If the radius chosen is too small, higher precision is needed to touch a barcode. It can be helpful to the user experience to increase the radius in this case.
Rectangular Location Selection
The RectangularLocationSelection lets you define the size of a rectangle around the point of interest (see previous section). Any code outside of the rectangle will not be recognized. One of the main use cases for the rectangular location selection is to restrict TextCapture to only capture text inside a small area instead of the whole screen or restrict BarcodeCapture to a small area if RadiusLocationSelection is not a good fit.
A RectangularLocationSelection is created by specifying the size of the rectangle and then setting it on the barcode/text capture settings with BarcodeCaptureSettings.locationSelection. For example, the code below creates a rectangular location selection for a very thin area taking 10% of the view’s height and 90% of the view’s width:
var barcodeCaptureSettings = ...;
barcodeCaptureSettings.locationSelection = RectangularLocationSelection.withSize(
    SizeWithUnit(DoubleWithUnit(0.9, MeasureUnit.fraction), DoubleWithUnit(0.1, MeasureUnit.fraction)));
The size of the rectangle can also be set by only providing either the width or the height and then an aspect ratio to calculate the other dimension. This can be especially useful for defining a square area:
var barcodeCaptureSettings = ...;
barcodeCaptureSettings.locationSelection =
    RectangularLocationSelection.withWidthAndAspect(DoubleWithUnit(0.5, MeasureUnit.fraction), 1);
Debugging The Scan Area And Location Selection
It can be important to visually debug the scan area to make sure that it is configured exactly how it should be.
To this purpose you can enable an overlay that visualizes everything that was set in the scan area through BarcodeCaptureOverlay.shouldShowScanAreaGuides:
var overlay = ...;
overlay.shouldShowScanAreaGuides = true;
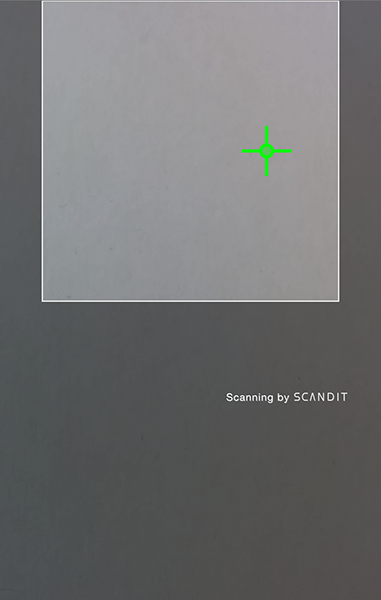
Visualized are:
The scan area including the margins by a light grey rectangle
The radius location selection by a green crosshair
The above visualization is for the following example settings:
var barcodeCaptureSettings = ...;
barcodeCaptureSettings.locationSelection = RadiusLocationSelection(DoubleWithUnit(5.0, MeasureUnit.dip));

var view = DataCaptureView.forContext(context,
    pointOfInterest:
    PointWithUnit(DoubleWithUnit(0.5, MeasureUnit.fraction), DoubleWithUnit(0.25, MeasureUnit.fraction)),
    scanAreaMargins: MarginsWithUnit(
        DoubleWithUnit(40.0, MeasureUnit.dip),
        DoubleWithUnit(0.0, MeasureUnit.dip),
        DoubleWithUnit(40.0, MeasureUnit.dip),
        DoubleWithUnit(0.5, MeasureUnit.fraction)
    )
);