Get Started With MatrixScan Count
What is MatrixScan Count?
MatrixScan Count is an out-of-the-box scan and count solution for counting and receiving multiple items at once, in which user interface (UI) elements and interactions are built into a workflow.
UI Overview
MatrixScan Count leans on the familiar paradigm of a camera, including a shutter button that the user operates in order to initiate scanning.
The user is initially guided to “Tap shutter to scan items”.
A loading indicator is present for a split second, indicating to hold still while scanning is in progress.
An initial calibration may be triggered after the scanning phase if the user stands too far away from or too close to the items.
Feedback is overlaid as augmented reality (AR) icons on top of scanned barcodes. A button counter badge and progress bar provide further confirmation of scan. Additionally, AR icons can be used to indicate codes that are unscannable, or items that should not be present.
The counter badge simply counts the number of codes scanned.
The progress bar replaces the counter badge if the user is are scanning against a list of expected codes (for example, against an item list or manifest). It shows how many of the expected codes have been detected.
Upon completing the scanning process, if all items have been successfully scanned, you can advance the user to the next scan automatically. Next steps may be finalizing order receipt if all items are present, reviewing the scan list to identify items that shouldn’t be present, or moving on to the next order (Note: The SDK does not include a UI for reviewing the scan list, but a recommended UI for this process can be seen in our Receiving Sample).
MatrixScan Count is implemented through functionality provided by BarcodeCount.
Requirements
The Scandit Data Capture SDK. Check out this guide.
A valid Scandit Data Capture SDK license key including MatrixScan AR add-on. You can sign up for a free test account at ssl.scandit.com.
Supported Devices
Runs on iOS and selected Android devices. Contact support for more details.
Supported Symbologies
MatrixScan Count supports all symbologies except DotCode, MaxiCode and postal codes (KIX, RM4SCC).
Quick Start Guide
Barcode Count is a data capture mode that implements MatrixScan Count. In this guide you will learn step by step how to add Barcode Count to your application.
Roughly, the steps are:
Create a new Data Capture Context instance
Configure the Barcode Count Mode
Obtain camera instance and set frame source used
Register the listener to be informed when scanned phase is over
Set capture view and AR overlays
Set up the camera so that it switches on when you are in scanning view
Store and retrieve scanned barcodes
Reset Barcode Count mode
List and Exit callbacks
1. Create A New Data Capture Context Instance
The first step to add capture capabilities to your application is to create a new Data Capture Context. The context expects a valid Scandit Data Capture SDK license key during construction.
DataCaptureContext dataCaptureContext = DataCaptureContext.forLicenseKey("-- ENTER YOUR SCANDIT LICENSE KEY HERE --");
2. Configure The Barcode Count Mode
The main entry point for the Barcode Count Mode is the BarcodeCount object. It is configured through BarcodeCountSettings and allows you to register one or more listeners that are informed whenever a scan phase has finished.
For this tutorial, we will set up Barcode Count for tracking EAN13 codes. Change this to the correct symbologies for your use case (for example, Code 128, Code 39…).
BarcodeCountSettings settings = new BarcodeCountSettings();
settings.setSymbologyEnabled(Symbology.EAN13_UPCA, true);
If you are sure that your environment will only have unique barcodes (i.e. no duplicated values), you can also enable BarcodeCountSettings.expectsOnlyUniqueBarcodes. This option improves scanning performance as long as you are sure that no duplicates will be present. Next, create a BarcodeCount instance with the Data Capture Context and the settings initialized in the previous step:
BarcodeCount barcodeCount = BarcodeCount.forDataCaptureContext(context, settings);
3. Obtain Camera Instance And Set Frame Source Used
Our recommended camera settings should be used to achieve the best performance and user experience. The following couple of lines show how to get the recommended settings for MatrixScan Count and create the camera from it:
CameraSettings cameraSettings = BarcodeCount.createRecommendedCameraSettings();

Camera camera = Camera.getDefaultCamera();
camera.applySettings(cameraSettings);
Because the frame source is configurable, the data capture context must be told which frame source to use. This is done with a call to DataCaptureContext.setFrameSource():
dataCaptureContext.setFrameSource(camera);
4. Register The Listener To Be Informed When Scanned Phase Is Over
To keep track of the barcodes that have been scanned, implement the BarcodeCountListener interface and register the listener.
// Register self as a listener to monitor the barcode count session.
barcodeCount.addListener(this);
BarcodeCountListener.onScan() is called when the scan phase has finished and results can be retrieved from BarcodeCountSession.
5. Set Capture View And AR Overlays
MatrixScan Count’s built-in AR user interface includes buttons and overlays that guide the user through the capturing process. By adding a BarcodeCountView the scanning interface (camera preview and scanning UI elements) will be added automatically to your application.
Add a BarcodeCountView to your view hierarchy:
BarcodeCountView view = BarcodeCountView.newInstance(barcodeCount, captureView);
6. Set Up The Camera So That It Switches On When You Are In Scanning View
The camera is not automatically turned on when you are in a scanning view. You need to set up the camera so that it switches on when needed and it switches off when not needed anymore. Similarly BarcodeCount should also be enabled and disabled. For instance, you should switch off the camera when the BarcodeCountView is not visible anymore (including when the app goes in the background), similarly you want to switch on the camera when the BarcodeCountView is visible (including when the app goes to the foreground). One way to achieve this is the following:
@Override
protected void onPause() {
    camera.switchToDesiredState(FrameSourceState.OFF);
    super.onPause();
}

@Override
protected void onResume() {
    super.onResume();
    camera.switchToDesiredState(FrameSourceState.ON);
}
7. Store And Retrieve Scanned Barcodes
The values captured as part of the scanning process are part of the session, and the session is not accessible outside BarcodeCountListener.onScan(). Therefore, we recommend that you store the values to present a list, for example when the user taps the list icon. To do this, make a copy of BarcodeCountSession.recognizedBarcodes:
@Override
public void onScan(
    @NonNull BarcodeCount mode,
    @NonNull BarcodeCountSession session,
    @NonNull FrameData data
) {
    allRecognizedBarcodes = session.getRecognizedBarcodes().values();
}
8. Reset Barcode Count Mode
When the scanning process is over, you need to reset the mode to make it ready for the next process. This clears the list of barcodes scanned and all the AR overlays.
To reset Barcode Count’s scanning process, you need to call the BarcodeCount.reset() method.
barcodeCount.reset();
9. List And Exit Callbacks
The UI includes two icons (buttons) named “List” and “Exit”. The SDK provides the callbacks so you can add the desired action when those icons are tapped by the user.
@Override
public void onListButtonTapped(
    @NonNull BarcodeCountView view
) {
    // Show the current progress but the order is not completed
}

@Override
public void onExitButtonTapped(
    @NonNull BarcodeCountView view
) {
    // The order is completed
}
Advanced Settings
Scanning Against A List
There is a function to set a list of expected barcodes if you are scanning against a manifest or item list. If this is used, a progress bar is added to the UI, so you can keep track of the process while scanning.
When scanning against a list, the UI will also show red icons to mark scanned barcodes that aren’t present on the list.
List<TargetBarcode> targetBarcodes = new ArrayList<>();
targetBarcodes.add(TargetBarcode.create("data", 1));
BarcodeCountCaptureList captureList = BarcodeCountCaptureList.create(this, targetBarcodes);
barcodeCount.setBarcodeCountCaptureList(captureList);
Barcode Count Status
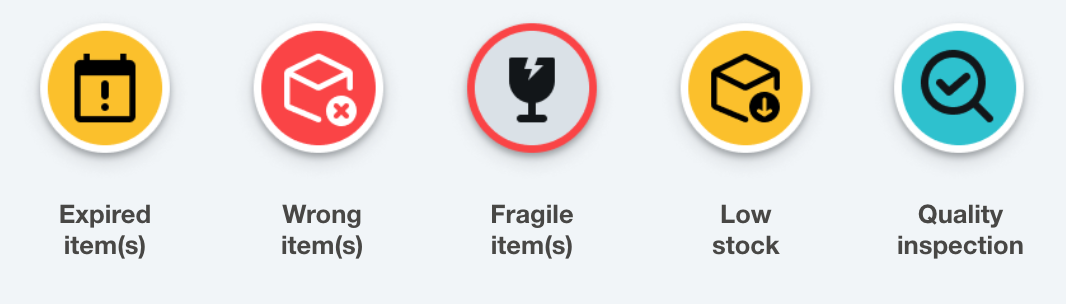
This feature is used to provide users with more details regarding the items they’re scanning in order to aid effective handling. The icons (available as part of the SDK) appear as an AR overlay after tapping the “Status Mode” button and can be used to highlight the following:
Expired products
Items requiring quality inspection
Items that are low in stock
Wrong items
Fragile items
Please check the ExpiryManagementSample to see how you can implement it in your own application.
Strap Mode
It can be difficult to reach the shutter button if the smart device is attached to the user’s wrist by a strap or similar. In this instance, you can enable a floating shutter button that can be positioned by the end user in a more ergonomically suitable position.
barcodeCountView.setShouldShowFloatingShutterButton(true);
Filtering
If you have several types of barcodes on your label/package, you may want to scan only one of them.
In this case, you can filter the others out. This can be done by symbology, symbol count, or setting a regex.
For example, you might want to scan only Code 128 barcodes and no PDF417 ones.
BarcodeCountSettings settings = new BarcodeCountSettings();
barcodeCountSettings.enableSymbologies(enabledSymbologies);

Set<Symbology> excludedSymbologies = new HashSet<>();
excludedSymbologies.add(Symbology.PDF417);
BarcodeFilterSettings filterSettings = settings.getFilterSettings();
filterSettings.setExcludedSymbologies(excludedSymbologies);
Or, you want to exclude all the barcodes starting with 4 numbers:
BarcodeCountSettings settings = new BarcodeCountSettings();

BarcodeFilterSettings filterSettings = settings.getFilterSettings();
filterSettings.setExcludedCodesRegex("^1234.*");
Clear Screen Button
There are situations in which the user may find it helpful to clean up their screen (i.e. clear all the AR overlays) but keep the list of barcodes scanned.
If this is the case, you can enable the “Clear screen” button.
barcodeCountView.setShouldShowClearHighlightsButton(true);
Customize Overlay Colors
MatrixScan Count comes with recommended and user-tested AR overlays. However, if you wish to customize the overlay colors, once the overlay has been added, you can conform to the BarcodeCountViewListener interface. The methods BarcodeCountViewListener.brushForRecognizedBarcode() and BarcodeCountViewListener.brushForUnrecognizedBarcode() are invoked every time a new recognized or unrecognized barcode appears. These can be used to set a brush that will be used to highlight that specific barcode in the overlay. Keep in mind that these methods are relevant only when using the style BarcodeCountViewStyle.DOT.
@Nullable
@Override
public Brush brushForRecognizedBarcode(
        @NonNull BarcodeCountView view, @NonNull TrackedBarcode trackedBarcode) {
    // Return a custom brush
}

@Nullable
@Override
public Brush brushForUnrecognizedBarcode(
        @NonNull BarcodeCountView view, @NonNull TrackedBarcode trackedBarcode) {
    // Return a custom brush
}
Notifications
If you want to be notified when a user taps on an overlay, you need to implement the BarcodeCountViewListener.onRecognizedBarcodeTapped() and BarcodeCountViewListener.onUnrecognizedBarcodeTapped() methods.
@Override
public void onRecognizedBarcodeTapped(
        @NonNull BarcodeCountView view, @NonNull TrackedBarcode trackedBarcode) {
    // Do something with the tapped barcode
}

@Override
public void onUnrecognizedBarcodeTapped(
        @NonNull BarcodeCountView view, @NonNull TrackedBarcode trackedBarcode) {
    // Do something with the tapped barcode
}
Disable UI Elements
The UI is an integral part of MatrixScan Count and we do not recommend that you use it without it. However, if you wish to disable UI elements you can do it as follows.
Disable buttons:
barcodeCountView.setShouldShowListButton(false);
barcodeCountView.setShouldShowExitButton(false);
barcodeCountView.setShouldShowShutterButton(false);
Disable feedback and hints:
barcodeCountView.setShouldShowUserGuidanceView(false);
barcodeCountView.setShouldShowHints(false);