Note
The SparkScan APIs are still in beta and may change in future versions of Scandit Data Capture SDK.
High-Speed Single Scanning
What is SparkScan?
For most people integrating scanning for the first time our pre-built component SparkScan is the best and quickest place to start. It includes a pre-built scanning interface that floats on top of any native application.
This bundles multiple scanning features together and addresses many common challenges associated with scanning on smart devices.

Run SparkScan Samples
A simple sample that demonstrates how to populate a list of scanned barcodes using the Scandit SparkScan API. |
SparkScan Quick Start Guide
Add the SDK to your App
Prerequisites
The latest stable version of Node.js and npm (required only if including and building the SDK as part of an app, instead of just including it as an external resource from a CDN in HTML).
A valid Scandit Data Capture SDK license key. You can sign up for a free test account at ssl.scandit.com.
Note
Devices running the Scandit Data Capture SDK need to have a GPU and run a browser capable of making it available (requires WebGL - current support? and OffscreenCanvas - current support?) or the performance will drastically decrease.
Add the SDK
Get a License Key
If you have a paid subscription, please reach out to support@scandit.com if you need a new license key.
Additional Information
When using the Scandit Data Capture SDK you will want to set the camera as the frame source for various capture modes. The camera permissions are handled by the browser, can only be granted if a secure context is used and have to be accepted by the user explicitly when needed.
Progressive Web App (PWA)
You can easily configure the scanner to work offline making the web app progressive (Progressive Web App). There are some settings to consider though. If you use workbox , or you’re using a tool that use workbox under the hood like Vite PWA , you must consider to set these options:
{
  globPatterns: ["**/*.{css,html,ico,png,svg,woff2}", "**/*.{wasm,js,data}"], // Be sure to add also .wasm
  maximumFileSizeToCacheInBytes: 20 * 1024 * 1024, // Increase size cache up to 6mb
  ignoreURLParametersMatching: [/^v/], // Ignore ?v=x.x.x query string param when using importScripts
}
With these settings in place and the service worker correctly configured, you will be able to have a full offline scanning experience.
Note: on iOS there’s a persisting issue while accessing the video stream inside a progressive web app
Get Started With SparkScan
In this guide you will learn step by step how to add SparkScan to your application.
Roughly, the steps are:
Create a new Data Capture Context instance.
Configure the Spark Scan Mode.
Create the SparkScanView with the desired settings and bind it to the application’s lifecycle.
Register the listener to be informed when new barcodes are scanned and update your data whenever this event occurs.
1. Create a New Data Capture Context Instance
The first step to add capture capabilities to your application is to create a new Data Capture Context. The context expects a valid Scandit Data Capture SDK license key during construction.
await configure({
  libraryLocation: new URL("library/engine", document.baseURI).toString(),
  licenseKey: "-- ENTER YOUR SCANDIT LICENSE KEY HERE --",
  moduleLoaders: [barcodeCaptureLoader()],
});

const dataCaptureContext = await DataCaptureContext.create();
2. Configure the SparkScan Mode
The SparkScan Mode is configured through SparkScanSettings and allows you to register one or more listeners that are informed whenever a new barcode is scanned.
For this tutorial, we will set up SparkScan for scanning EAN13 codes. Change this to the correct symbologies for your use case (for example, Code 128, Code 39…).
const sparkScanSettings = new SparkScanSettings();
sparkScanSettings.enableSymbologies([Symbology.EAN13UPCA]);
Next, create a SparkScan instance with the settings initialized in the previous step:
const sparkScan = SparkScan.forSettings(settings)
3. Setup the Spark Scan View
The SparkScan built-in user interface includes the camera preview and scanning UI elements. These guide the user through the scanning process.
The SparkScanView appearance can be customized through SparkScanViewSettings.
const viewSettings = new SparkScanViewSettings()
// setup the desired appearance settings by updating the fields in the object above
By adding a SparkScanView, the scanning interface (camera preview and scanning UI elements) will be added automatically to your application.
Add a SparkScanView to your view hierarchy:
const sparkScanView = SparkScanView.forElement(
  document.body,
  dataCaptureContext,
  sparkScan,
  sparkScanViewSettings,
);
Additionally, make sure to call SparkScanView.stopScanning() in your app state handling logic. You have to call this for the correct functioning of the SparkScanView.
function closeApp() {
  sparkScanView.stopScanning()
}
4. Register the Listener to Be Informed When a New Barcode Is Scanned
To keep track of the barcodes that have been scanned, implement the SparkScanListener interface and register the listener to the SparkScan mode.
const listener: SparkScanListener = {
  didScan: (sparkScan, session, frameData) => {
    const barcode = session.newlyRecognizedBarcodes[0];
    ...
  },
};

sparkScan.addListener(listener);
SparkScanListener.didScan() is called when a new barcode has been scanned. This result can be retrieved from SparkScanSession.newlyRecognizedBarcode. Please note that this list only contains one barcode entry.
function onBarcodeScanned(sparkScan: SparkScan, session: SparkScanSession, frameData: FrameData) {
  // Gather the recognized barcode
  const [barcode] = session.newlyRecognizedBarcodes

  // Do something with the recognized barcode
  ...
};
5. Scan Some Barcodes
Now that you’re up and running, go find some barcodes to scan. Don’t feel like getting up from your desk? Here’s a handy pdf of barcodes you can print out.
Learn More About SparkScan
UI overview
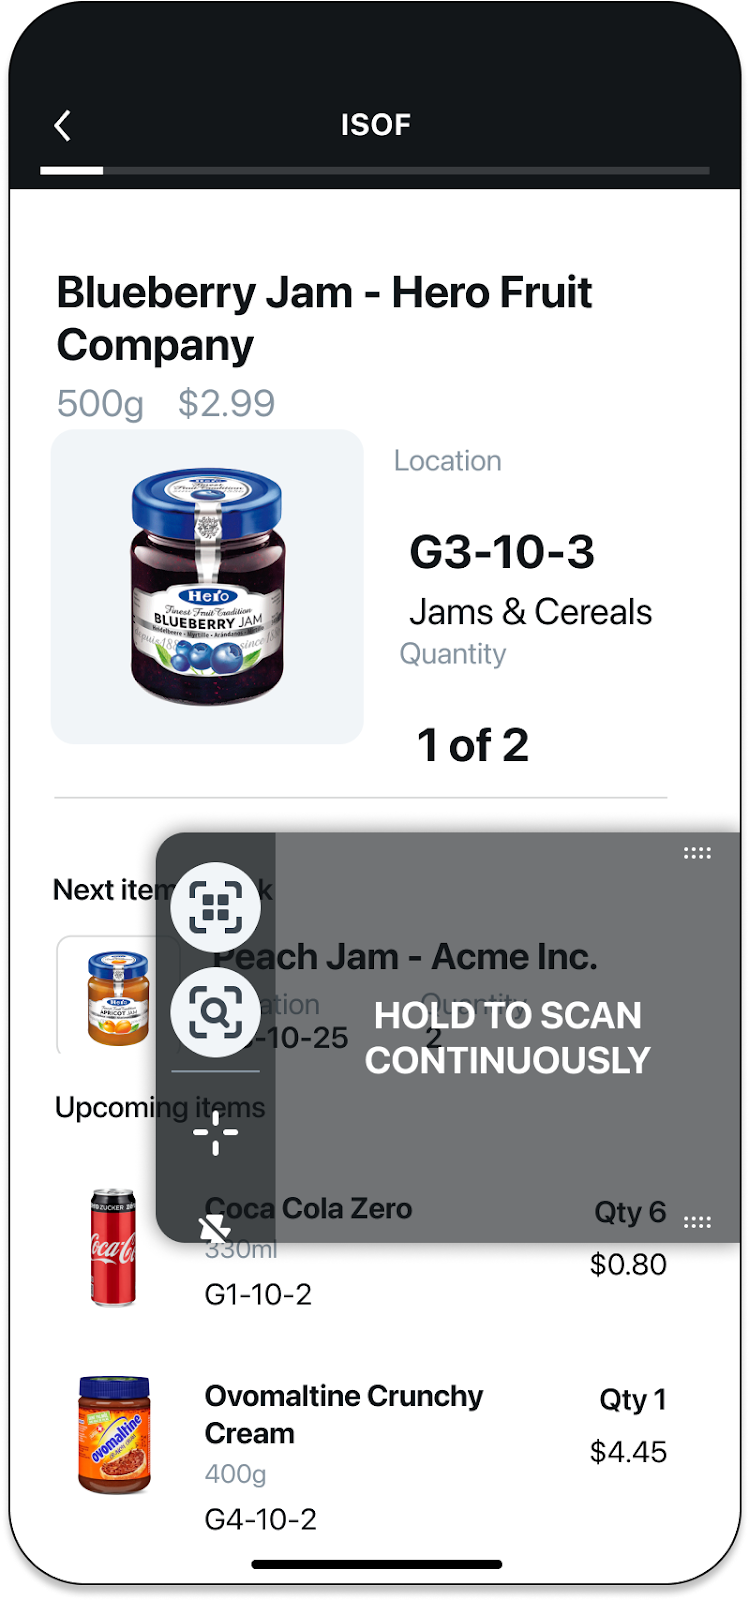
The SparkScan UI is minimal, meant to be overlayed on top of any application without the need to adapt the existing app, while offering the best user experience.
Three main elements compose the UI:

NOTE: Additional UI elements are available for developers to use if their app logic requires displaying errors or additional feedback while scanning. More information in Customisation and advanced capabilities.
Workflow Options
The workflow here is based on the default configuration of SparkScan, carefully picked as a result of extensive user testing and customer feedback from the field.
But not all workflows look the same, and your needs may differ. That’s why SparkScan comes with a set of options to configure the scanner and to best fit in the desired workflow.
Scanning modes:
Default mode: Ideal for close-range and fast paced scanning. This mode will display a small camera preview to aid with aiming. The preview size and zoom level can be adjusted as needed.
Target mode: Ideal for scanning scenarios where precision is important. This mode will add an aimer to the preview, to precisely select the barcode to scan. This is useful when multiple barcodes are in view (e.g. long range scanning).
Users can enable the target mode by toggling the dedicated icon in the setting toolbar, shown by default (SparkScanView.targetModeButtonVisible). Hiding this button will remove the possibility to toggle scanning mode for the end-user.
Scanning behaviors:
Single scan: Scan one barcode at a time. The user needs to trigger the scanner every time to scan a barcode. This allows for a more controlled scanning and lower battery consumption.
Continuous scan: Scan barcodes consecutively. The user needs to trigger the scanner once and barcodes will be scanned without any further interaction before each scan. This allows for a smoother experience when multiple barcodes need to be scanned consecutively.
Users can enable continuous scanning by holding down the trigger button (SparkScanViewSettings.holdToScanEnabled). This gesture can be disabled.
Developers can show a dedicated setting in the toolbar to let the user enable continuous scan mode (SparkScanView.scanningBehaviorButtonVisible), which is hidden by default.
Camera preview behaviors:
Default: Preview fades aways when the scanner is off. This lets the user check important information displayed by the app and reduces battery consumption.
Persistent: Preview remains visible, but darkened, even when the scanner is off. This is useful for scenarios where you want to select a barcode (among many) or need to look through the preview at all times (to ensure the right scan) - especially if used in conjunction with the target mode.
Developers can set a combination of scanning mode, scanning behavior and camera preview behavior - defining the initial state of the scanner. This can be done by setting the default scanning mode (SparkScanViewSettings.defaultScanningMode).
Workflow Description
When SparkScan is started, the UI presents just the trigger button, collapsed on the side.
To start scanning, the user can:
swipe to open the button, then tap on it.
tap on the collapsed trigger button.
When the scanner is active the mini preview is shown.
Depending on the scanning mode enabled, the workflow will behave differently:
Upon scan the user will receive audio/haptic feedback confirming the scan, and the mini preview will display the scanned barcode for a small amount of time before fading away.
Tapping on the trigger button will restart immediately the scanner.
Upon completing the scanning process (or to interact with the customer app layer), the user can tap in any area outside the trigger button and the mini preview. This collapses the scanner button back to the side, going back to the initial state.
|
Workflow example. |
Supported Devices
Runs on iOS and Android devices.
Supported Symbologies
SparkScan supports all of the major symbologies listed here: Barcode Symbologies except DotCode, MaxiCode, ArUco, and postal codes (KIX, RM4SCC, LAPA 4SC, USPS Intelligent Mail, etc.).
For more symbology specific information, please refer to this link.
Customisation and advanced capabilities
SparkScan offers an out-of-the-box experience optimized for efficiency and a frictionless worker experience. This experience has been crafted after many user testing and with the product knowledge gained in the many years of Scandit.
While this out-of-the-box experience will suit most use-cases, we understand there are some special cases in which some configuration is still needed.
In this page, we collect the main customization and advanced settings you may need to customize SparkScan to obtain the best experience possible.
Advanced capabilities
Trigger the Error State
You may want to introduce logic in your app to show an error message when scanning specific barcodes (e.g. barcodes already added to the list, barcodes from the wrong lot etc.). SparkScan offers a built-in error state you can easily set to trigger an error feedback prompt to the user. You will be able to customize:
To emit an error, you have to implement a SparkScanFeedbackDelegate and set it to the SparkScanView:
sparkScanView.feedbackDelegate = sparkScanFeedbackDelegate;
In the SparkScanFeedbackDelegate.getFeedbackForBarcode() you can then return an error or a success feedback:
const sparkScanFeedbackDelegate = {
      feedbackForBarcode: (barcode: Barcode) => {
          if (isValidBarcode(barcode)) {
              return new SparkScanBarcodeSuccessFeedback();
          } else {
              return new SparkScanBarcodeErrorFeedback(
                  'This code should not have been scanned',
                  60 * 1000,
                  Color.fromHex('#FF0000'),
                  new Brush(Color.fromHex('#FF0000'), Color.fromHex('#FF0000'), 1),
              );
          }
      },
};
NOTE: You can have different error states triggered by different logic conditions. For example you can trigger an error state when a wrong barcode is scanned, and another one when a duplicate barcode is scanned. These errors can show different colors and have different timeouts.

|

|
NOTE: A high timeout (e.g. >10s) typically requires the users to interact with the UI to start scanning again. This is a good choice when you want to interrupt the scanning workflow (e.g. because a wrong barcode is scanned and some actions need to be performed). A small timeout (e.g. <2s) could allow the user to scan again without having to interact with the app, just momentarily pausing the workflow to acknowledge that a “special” barcode has been scanned. If timeout is set to 0 workflow is not paused at all.
Reject barcodes
To prevent scanning unwanted barcodes (like those already listed or from incorrect lots), use SparkScan’s built-in error state. Setting the SparkScanBarcodeErrorFeedback.resumeCapturingDelay parameter to 0 allows the user to continue scanning immediately without pausing on rejected codes.
Add More Advanced Scanning Modes to the Setting Toolbar
SparkScan is our best solution for high-speed single scanning and scan-intensive workflows. Depending on your use case, you can use SparkScan scan in conjunction with other Scandit advanced scanning modes, such as MatrixScan Find or MatrixScan Count, to speed up your workflows.
SparkScan offers pre-build buttons you can add to the setting toolbar to easily move to different scan modes from within the SparkScan UI.
First you will need to show these buttons:
// Show the MatrixScan Count and MatrixScan Find buttons
sparkScanView.barcodeCountButtonVisible = true;
sparkScanView.fastFindButtonVisible = true;
|
|
Standard toolbar. |
Toolbar with advanced modes icons shown. |
Customization
Customize colors and texts
All texts (guidance inside the trigger button and hints’ messages), colors and opacity of the SparkScan UI elements (trigger button, setting toolbar, toasts) can be customized to match the desired language and color scheme.
Please refer to SparkScanView for the full list of available parameters.
Add Controls to the Setting Toolbar
The Setting Toolbar comes with default buttons included, but the full list of available controls includes:
Target Mode (visible by default)
Continuous Mode
Torch Control (visible by default)
Audio Feedback Control
Haptics Control
Left-handed Mode
In some cases you want to avoid end users from accessing these controls, for example:
to prevent them disabling audio feedback on scan, as the work environment is always noisy
to prevent them toggling the continuous mode, as you want them to pick items one by one
etc.
To add controls to the settings toolbar, just change the visibility of these buttons. Please refer to SparkScanView for the full list of parameters.