Advanced Configurations
SparkScan is optimized by default for efficiency, accuracy, and a seamless user experience. However, there are some cases where you might want to customize the behavior of SparkScan. This guide will show you how to add additional capabilities and further customize SparkScan to best fit your needs.
Advanced Capabilities
Hardware Button Control
Allowing the end user to control the scanner with hardware buttons can be useful if your users typically wear gloves. It can also improve ergonomics in some workflows.
SparkScan offers a built-in API to let you do this via SDCSparkScanViewSettings.hardwareTriggerEnabled.
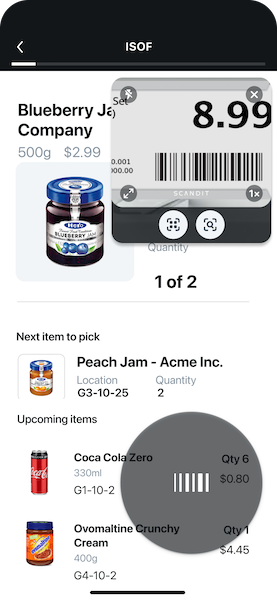
Trigger Error State
You may want to introduce logic in your app to show an error message when scanning specific barcodes (e.g. barcodes already added to the list, barcodes from the wrong lot etc.). SparkScan offers a built-in error state you can easily set to trigger an error feedback prompt to the user.
You can customize:
- The text message.
-
The timeout of the error message: the scanner will be paused for the specified amount of time, but the user can quickly restart the scanning process by tapping the trigger button.
tipA high timeout (>10s) typically requires the users to interact with the UI to start scanning again. This is a good choice when you want to interrupt the scanning workflow (e.g. because a wrong barcode is scanned and some actions need to be performed). A small timeout (<2s) could allow the user to scan again without having to interact with the app, just momentarily pausing the workflow to acknowledge that a “special” barcode has been scanned.
- The color of the flashing screen upon scan. You can enable or disable the visual feedback via
SDCSparkScanViewSettings.visualFeedbackEnabledand you can control the color viaSDCSparkScanViewFeedback. - The color of the highlight for the scanned barcode.
- The feedback (sound, vibration).
To emit an error, you have to implement a SDCSparkScanFeedbackDelegate and set it to the SparkScanView:
sparkScanView.feedbackDelegate = self
In the SDCSparkScanFeedbackDelegate.feedbackForBarcode you can then return an error or a success feedback:
extension ViewController: SparkScanFeedbackDelegate {
  func feedback(for barcode: Barcode) -> SparkScanBarcodeFeedback? {
      guard !barcode.isRejected else {
          return SparkScanBarcodeErrorFeedback(message: "This code should not have been scanned",
              resumeCapturingDelay: 60)
      }
      return SparkScanBarcodeSuccessFeedback()
  }
}
You can have different error states triggered by different logic conditions. For example you can trigger an error state when a wrong barcode is scanned, and another one when a duplicate barcode is scanned. These errors can show different colors and have different timeouts.
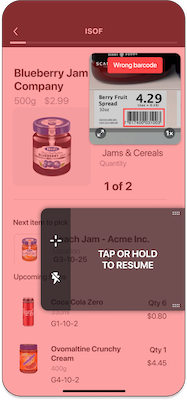
This error state for a code that should not have been scanned.

This error state for a code that has been scanned more than once.
Reject Barcodes
To prevent scanning unwanted barcodes (like those already listed or from incorrect lots), use SparkScan’s built-in error state. Setting the SDCSparkScanBarcodeErrorFeedback.resumeCapturingDelay parameter to 0 allows the user to continue scanning immediately without pausing on rejected codes.
UI Customization
Please refer to SDCSparkScanView for the full list of parameters.
You can customize many aspects of the default SparkScan UI and UX to suit your needs and particular use case. These customizations include the:
- Colors of all items (i.e. icons, buttons, toolbar)
- Trigger button icon
- All toast messages
- Size of the preview
- Visibility of any/all icons
- Trigger button
Trigger button
The default trigger button in SparkScan has been designed based on our experience and feedback received to be generally suited across a multitude of industry use cases, custom trigger implementations are still supported.
This is achieved by hiding the default trigger button (via sparkScanView.isTriggerButtonVisible), and then controlling the scanning process as best suits your needs:
- Using a custom button embedded in you app to call
sparkScanView.startScanning()to start scanning. You can adapt the trigger button to the state changes using the SparkScanViewUiListener. - Using the mini-preview close button (via
sparkScanView.previewCloseControlVisible) or your desired button (viasparkScanView.pauseScanning()) to stop scanning.
Alternatively, you can rely entirely on a hardware button, if you have enabled that feature (via sparkScanViewSettings.hardwareTriggerEnabled).
Some example customizations:
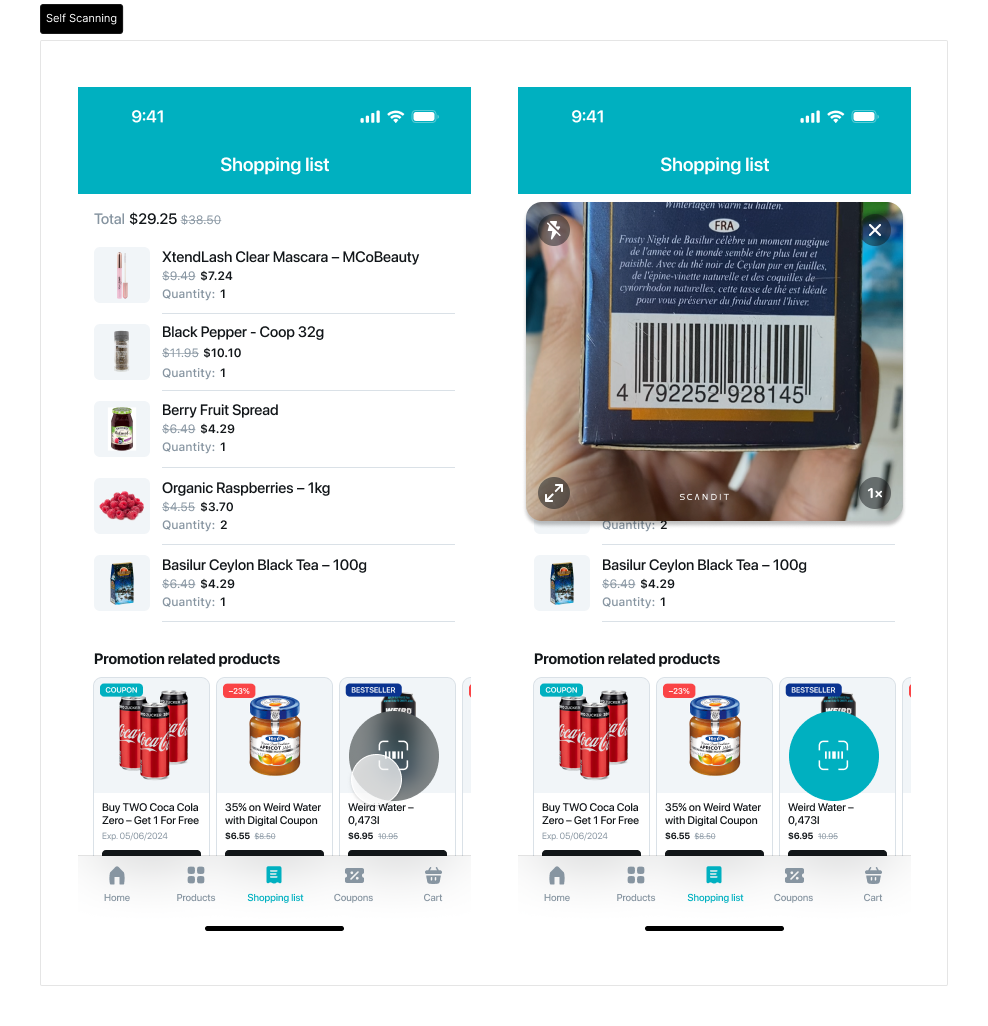
Customized Self-Scanning application with custom FAB button and preview expanded by default
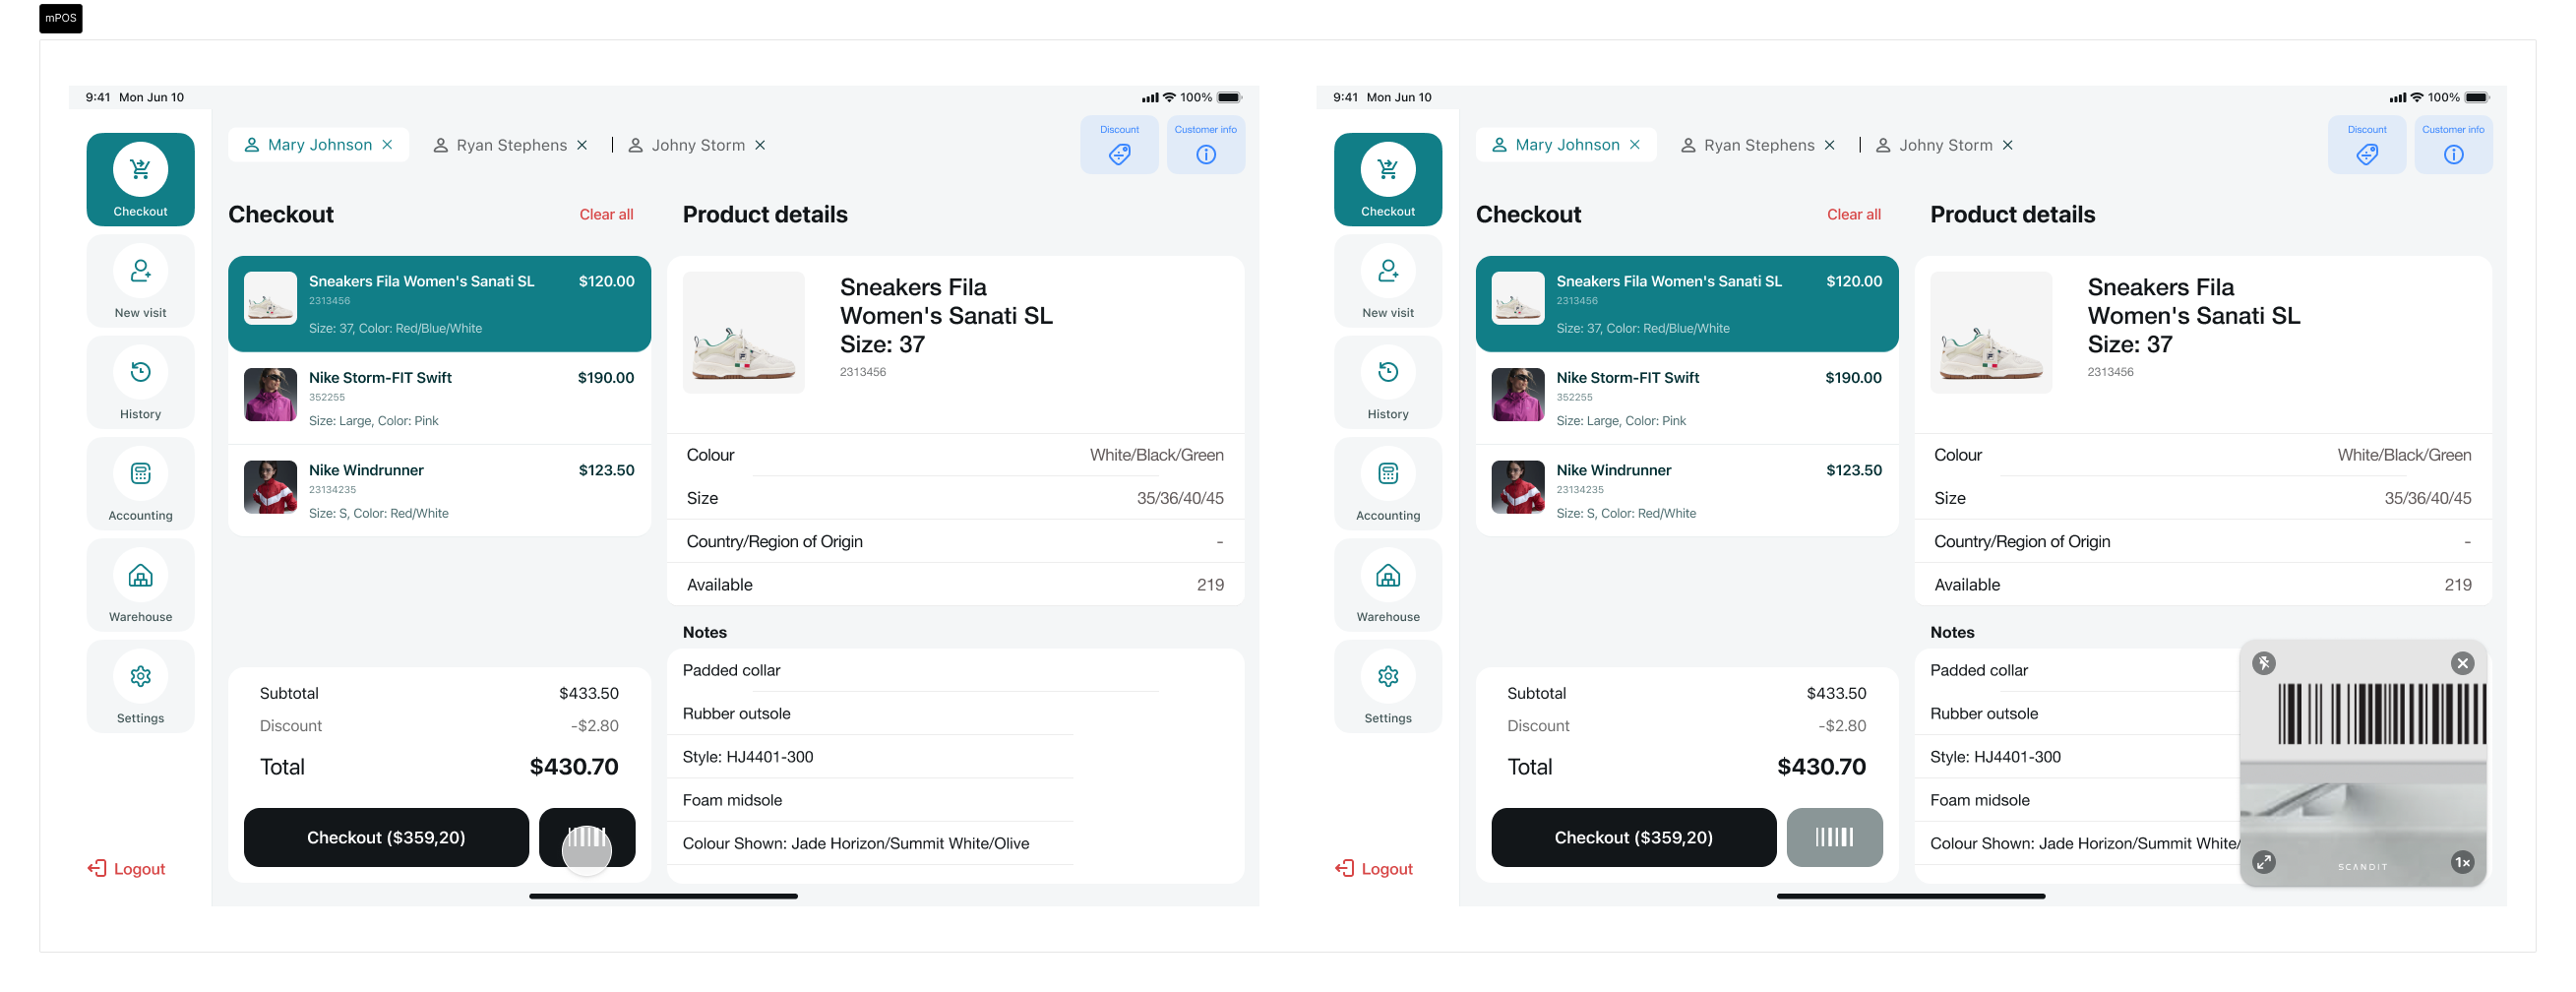
Customized mPOS application using the existing scan button to trigger the scanner
Settings Toolbar
The Settings Toolbar is hidden by default in SparkScan, as the most relevant controls are already visible in the camera preview. However, additional advanced controls can be made available, such as:
- Target Mode
- Continuos Mode
By enabling the visibility of these buttons, the Settings Toolbar will appear at the bottom of the camera preview.
Add Advanced Scanning Modes to the Toolbar
SparkScan is our best solution for high-speed single scanning and scan-intensive workflows. Depending on your use case, you can use SparkScan in conjunction with other Scandit advanced scanning modes, such as MatrixScan Find or MatrixScan Count, to speed up your workflows.
SparkScan offers pre-build buttons you can add to the setting toolbar to easily move to different scan modes from within the SparkScan UI.
First you will need to show these buttons:
// Show the Label Capture, MatrixScan Count, and MatrixScan Find buttons
sparkScanView.isLabelCaptureButtonVisible = true
sparkScanView.isBarcodeCountButtonVisible = true
sparkScanView.isBarcodeFindButtonVisible = true
The standard toolbar without additional scanning modes added.
The toolbar with MatrixScan Find and MatrixScan Count buttons.
In addition you have to add a delegate to the SparkScanView via SparkScanView.uiDelegate. You will then receive callbacks when the MatrixScan Find button or MatrixScan Count button is tapped from the toolbar.
Workflow Options
This section explains all the available options to configure SparkScan to best fit your case, in case you found something that didn't work well in the default configuration (that remains our recommended option).
Developers can set a combination of scanning mode, scanning behavior and camera preview behavior - defining the initial state of the scanner. This can be done by setting the default scanning mode (SDCSparkScanViewSettings.defaultScanningMode). This combination allows for flexible configurations to suit different scanning needs.
Scanning Mode
The scanning mode determines the programmatic presence of an aimer in the preview to help with precision scanning.
| Mode | Description |
|---|---|
| Default | Generally recommended. This mode will display a small camera preview to aid with aiming. The preview size and zoom level can be adjusted as needed. User can aim easily at the intended barcode. |
| Target | This mode will always add an aimer to the camera preview to precisely select the barcode to scan. This is recommended only when selecting among many close barcodes is the common task. |
Even in the Default mode, SparkScan will automatically show an aimer when multiple barcodes are present in the view and no clear intention from the user to scan a single one is recorded (SDCSparkScanSettings.ScanIntention). Enabling the Target mode will simply force this "precision selection" state to be on at all time.
Scanning Behavior
The scanning behavior determines how barcodes are scanned - one at a time or continuously.
| Behavior | Description |
|---|---|
| Single scan | Scan one barcode at a time. The user needs to trigger the scanner every time to scan a barcode. This allows for a more controlled scanning and lower battery consumption. |
| Continuous scan | Scan barcodes consecutively. The user needs to trigger the scanner once and barcodes will be scanned without any further interaction before each scan. This allows for a smoother experience when multiple barcodes need to be scanned consecutively. |
Users can enable continuous scanning by holding down the trigger button. This gesture can be disabled (SDCSparkScanViewSettings.holdToScanEnabled).
Preview Behavior
The preview behavior determines how the camera preview behaves when the scanner is not actively scanning.
| Behavior | Description |
|---|---|
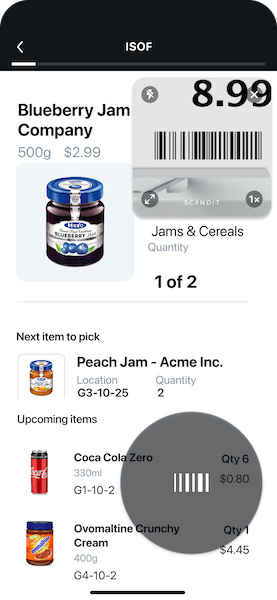
| Default | Preview fades away when the scanner is off. This lets the user check important information displayed by the app and reduces battery consumption. |
| Persistent | Preview remains visible, but darkened, even when the scanner is off. This is useful for scenarios where you want to select a barcode (among many) or need to look through the preview at all times (to ensure the right scan) - especially if used in conjunction with the target mode. |